It seems these days that meetings are much more likely to involve multiple time zones. If you are searching Outlook for an available slot in which to hold a meeting it can be extremely handy to have more than one time zone in your calendar. That way you can check that what works for you, isn't the middle of the night for the other attendees.
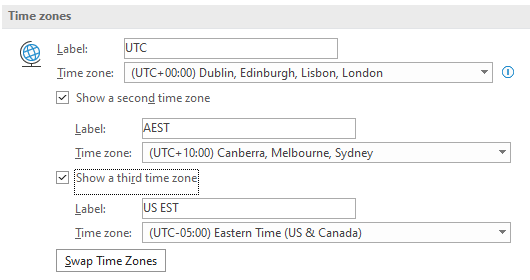
Outlook allows for the display of up to three time zones in your calendar. Here is how to set them up and change them:
- Open Outlook’s main calendar window and make sure you are in a day or a week view.
- To open the time zone settings:
- Right-click on the time strip, just to the left of the calendar day planner and select "Change Time Zone..." from the pop-up menu.
- OR, right-click on any area of the day planner without an appointment set. From the pop-up menu select "Calendar Options..." and scroll through the Options window until you come to the "Time zones" section.
- Put a tick in either, or both, of the checkboxes to add a second and/or third time zone.

- Under "Time zone" click on the drop-down button to choose from pre-defined time zone options.
- Click into the Label box to type a name label that makes sense to you. Keep it short - this will appear to the left of your Outlook calendar planner page.
- Click on OK to have your changes accepted.
Repeat the above to edit or remove time zones as you need.
Be wary of the "Swap Time Zones" option. Each time you press this Outlook toggles through which time zone is your primary one (top in the Options list and closest to your day planner in the calendar view). Any change to the primary time zone is also reflected in your Windows settings and becomes your computer's time zone.
If you preparing meetings or briefings across multiple time zones, three may not be enough. If you want a tip for multiple personalised world clocks, you can use this to create a series of time zone clocks.
Photo by Vince Veras on Unsplash


